
Building a handwired 9 key keyboard
required hardware list
- keyboard switches
- 1N4148 signal diodes
- QMK compatible microcontroller board such as Arduino Pro Micro (Atmega32u4), Raspberry Pi Pico (RP2040), etc.
- wire
- keyboard plate and case
- keycaps
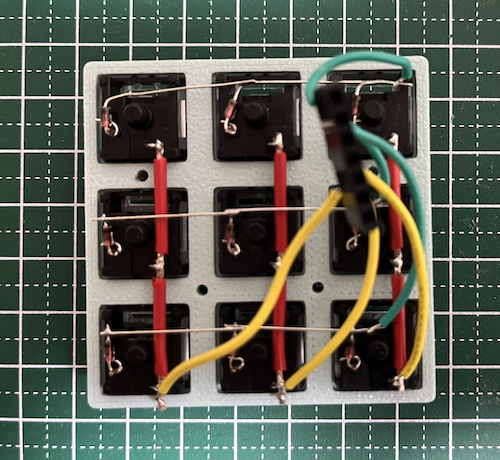
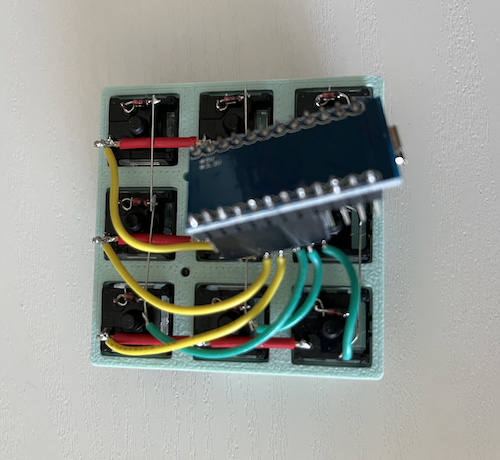
I 3d printed the plate, case and keycaps.
For the keyboard board and case, I used the model from here and increased the height of the plate, since I soldered the pin headers to pro micro and soldered the row and column wires to the female headers.

As for keycaps, I used openSCAD’s keycap library KeyV2 to create the models.
Currently, in order to use this library normally, you need to install the development snapshot of openSCAD.
To create your own keycaps, just open keys.scad in openSCAD and modify it.
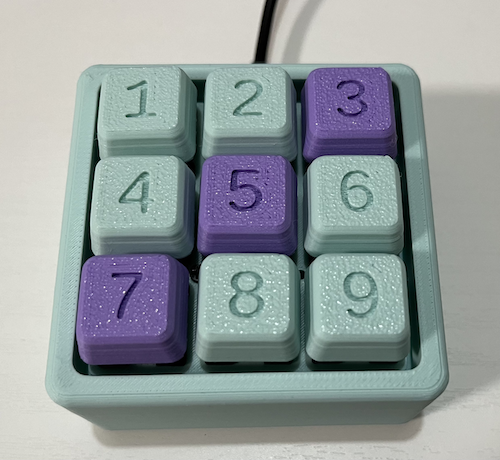
For example, my keycaps look like this:

To make printing easier, I used the g20 profile and printed upside down.
$stem_inner_slop = 0;

for (x = [0:1:2]) {
  for (y = [1:1:3]) {
    translate_u(y, -x) rounded_cherry() g20_row(3, 0) legend(str(y + 3 * x), size=9)
    upside_down() {
      $stem_support_type = "disable";
      key(true);
      dished() {
        legends($inset_legend_depth);
      }
    }
  }
}
QMK
environment setup
$ brew install qmk/qmk/qmk
$ brew install avr-gcc
$ qmk setup
create a new keyboard
$ qmk new-keyboard
Choose ortho_3x3 layout and atmega32u4 as MCU.
A new directory will be created under the qmk_firmware/keyboards/.
Move to your keyboard directory and open the info.json.
diode_direction: specifies the direction the diode is pointing.matrix_pins: GPIO pins connected to the matrix rows/columns.bootloader: change fromatmel-dfutocaterina.
keymap
Then open the keymap.c and customize the keyboard layout according to your liking.
For example, my layout looks like the following. In addition to the one for defining numbers, I also added a layer to define macros.
#include QMK_KEYBOARD_H

const uint16_t PROGMEM keymaps[][MATRIX_ROWS][MATRIX_COLS] = {
    /* LAYER 0
     * ┌───┬───┬───┐
     * │ 1 │ 2 │ 3 │
     * ├───┼───┼───┤
     * │ 4 │ 5 │ 6 │
     * ├───┼───┼───┤
     * │ 7 │ 8 │ 9 │
     * └───┴───┴───┘
     */
    [0] = LAYOUT_ortho_3x3(
        KC_1,       KC_2,      KC_3,
        KC_4,       KC_5,      KC_6,
        KC_7,       KC_8,      LT(1, KC_9)
    ),

    /* LAYER 1
    * ┌────────────────┬───────────────────┬─────────────────┐
    * │  input source  │ switch app window │   spotlight     │
    * ├────────────────┼───────────────────┼─────────────────┤
    * │ left alignment │     maximize      │ right alignment │
    * ├────────────────┼───────────────────┼─────────────────┤
    * │  power down    │        0          │                 │
    * └────────────────┴───────────────────┴─────────────────┘
    */
    [1] = LAYOUT_ortho_3x3(
        LCTL(KC_SPC),  LGUI(KC_F1), LGUI(KC_SPC),
        LCAG(KC_LEFT), LCAG(KC_M),  LCAG(KC_RGHT),
        KC_PWR,        KC_0,     KC_TRNS
    )
};
compile the firmware
$ qmk compile -kb mac_9key -km default
the last few lines of output will look like the following:
Creating load file for flashing: .build/mac_9key_default.hex                                        [OK]
Copying mac_9key_default.hex to qmk_firmware folder                                                 [OK]
Checking file size of mac_9key_default.hex                                                          [OK]
 * The firmware size is fine - 16060/28672 (56%, 12612 bytes free)
flash the firmware
Now, use the .hex format firmware file to flash your keyboard. You can use the command line or QMK Toolbox to flash the firmware. Check the documentation for details.
$ qmk flash -kb mac_9key -km default
After flashing the firmware, you can start testing your keyboard.